Payment Terminal Overview
Lynkwell’s Network Manager platform supports many industry-leading EV charging payment terminals. Sites using Lynkwell have seen that up to 70% of sessions are started using payment terminals when activated, making them an attractive feature for a growing charging network. This is especially true for satisfying EV drivers who are just traveling through, want to save time, and do not wish to download an app to charge.
Merchant Account Setup
Lynkwell recommends configuring your merchant account before your charging stations are installed, as it normally takes multiple business days to complete the setup, depending on which vendor you are working with.
Note: To complete the signup form, you must have signatory power at your organization and the organization's business information, such as the Employer Identification Number (EIN).
Payter Merchant Account Setup
To create a merchant account, visit the Payter Merchant Account Signup page. The person filling this out will need signing permissions for the company to be able to complete the form. It will take a few business days for the payment provider to process and complete the request. Once this is completed, Payter will provide you with a
Merchant Account Number, which is required to activate your payment terminal.If you are subscribed to Lynkwell's remote support offering, our team will complete the remaining steps in this guide.Nayax Merchant Account Setup
During the site onboarding process, a Nayax merchant account should be created for the site host. Nayax will issue a sub-operator ID for that account, which the system uses to route terminal revenue to the correct site host. Before any Nayax terminal can be added to a station, save this ID in Network Manager:
- Open Site Partners and select the site host that will operate the terminal.
- Enter the value provided by Nayax into the Nayax Sub-Operator ID field and save.
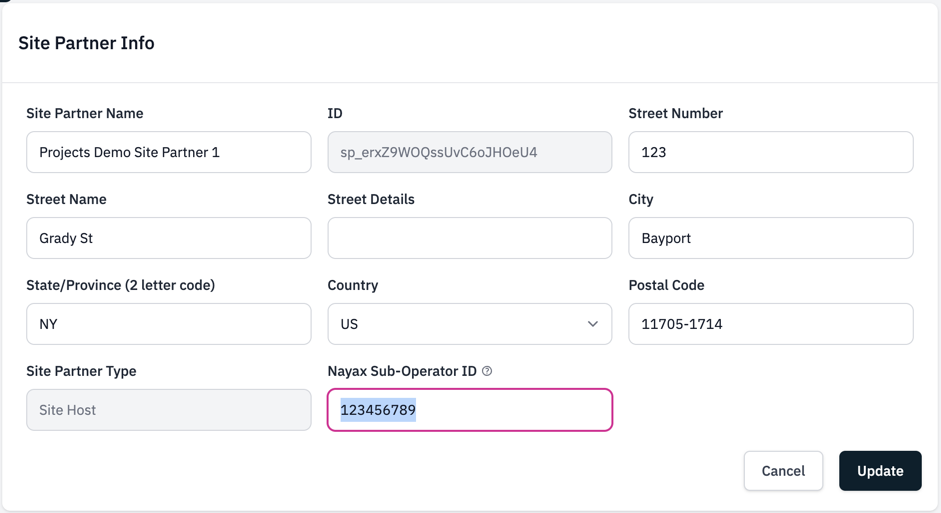
A location can have multiple site hosts. Set the ID on the one that should receive revenue from the terminal.
Self-Service Terminal Activation
Some payment providers require you to register or activate the payment terminal with their system before adding it to the Lynkwell Network Manager portal.
Payter Payment Terminal Activation
Before activating a Payter payment terminal inside the Lynkwell platform, you will need to register the device using the Payter Terminal Activation form. You will need the
Merchant Account Numberprovided in the previous step to do this. You will also need general contact information, the charging station ID to which the payment terminal is attached, and to specify whether or not the terminal is connected via a LAN cable.Nayax Payment Terminal Activation
Nayax terminals do not require manual activation. When you add a Nayax terminal to a charging station in Network Manager (Step 3), the system automatically registers and activates the terminal with Nayax. You can monitor the activation status directly in the Payment Terminal section. The initial Pending status will change to Active once activation is complete or update to Failed if an issue occurs.
Most Nayax terminals are activated within 2-3 business days. If the status still shows "Pending" after this time, reach out to Lynkwell Support for help.
Assign Terminal to Charging Station
Once you have set up your merchant account and activated the terminal, the final step is adding it to the charging station in the Network Manager portal. If you go through Lynkwell support, then this will be taken care of by our team. The integration type you select depends on your payment terminal provider: Hardware or Cloud for Payter terminals, and Hardware or Terminal for Nayax terminals.
- Locate the charging station in Network Manager either from the global search, locations page, or stations page.
- Select the charging station and scroll down to the Payment Terminal section.
- Click on Add new on the right side of this section.
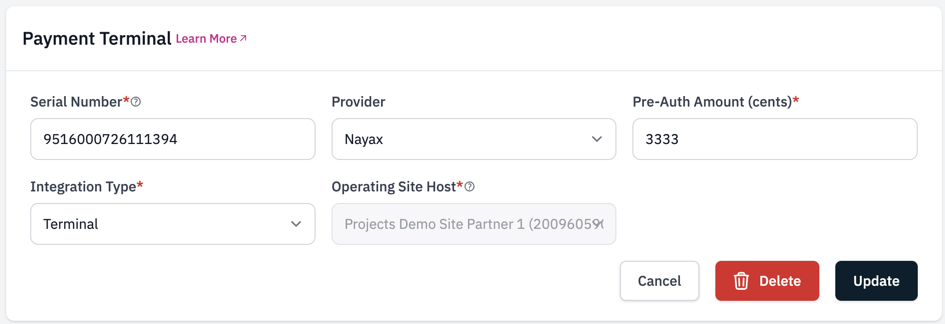
- Enter the serial number of the payment terminal installed on the station.
- Select the Provider of the payment terminal from the drop down list.
- Enter the Pre-Authorize amount for the payment terminal.
This is a hold amount to authorize the driver's card. Once the charging session is complete, the payment method will only be billed the final session amount. This isn’t a fee and is typically updated within 5-10 business days.
Note: The input field is in cents, but will convert and display the amount in dollars after saving the changes. (i.e. If you want to set a hold amount of $25, enter
2500as the input value) - Select the Integration Type for your provider.
Use Hardware or Cloud for Payter terminals, Hardware for Magtek terminals, and Hardware or Terminal for Nayax terminals. If you aren't sure which to use, reach out to Lynkwell Support.
- For Nayax terminals, select the Operating Site Host that should collect revenue for this terminal.
The dropdown lists the site hosts attached to this station's location that have a Nayax Sub-Operator ID set. If only one site host is eligible, it is selected automatically. If none are eligible, set a Nayax Sub-Operator ID on one of the site hosts (see the Nayax Merchant Account Setup section) before continuing.
- Save the changes.
Station Configuration
Once you have added the payment terminal to the station, confirm that the station is configured properly to use it. Consult your station's owner manual for this step. There should be, at a minimum, a configuration key for the pre-authorize amount, authentication, and the charging amount (per kWh or per minute).
Example: You are required to configure a Tritium unit to display the pricing for charging. In the example below, the rate applied to the station is using energy
$/kWhinstead oftime, and that it is for $0.55/kWh. Set this configuration in Network Manager (Stations>EVSE Commands>Advanced Commands>Change Configuration) using the Configuration Name (key):CreditCardPricePerKwhand your desired Configuration Value and pressing theSendbutton.You can confirm the update by selecting
Advanced Commands>Get Configuration (Using Keys)and usingCreditCardPricePerKwhas the key and pressing theSendbutton. Navigate toReal-Time Logs, to see the following in the return data:{ "configurationKey": [ { "key": "CreditCardPricePerKwh", "readonly": false, "value": "55" } ] }Verify
After making the above changes to the charging station(s), verify that they are working as intended. The best way to do this is to have a vehicle on standby to attempt a charging session using the payment terminal. Make sure that you can start the charge and that once it is done, the payment is processed accordingly. If you use Payter, you should be able to see on their backend the amount of that session. You can use it to reconcile with your records. For Nayax terminals, verify that the terminal activation status is not in a Pending state in Network Manager, and confirm with Lynkwell support that the
locationIdandevseUidhave been configured in the Nayax system before testing.