Setting Up a New Site in Lynkwell
This guide walks you through the process of setting up a new charging site using the Lynkwell platform. There are three options to do this: Projects (Lynkwell's streamlined onboarding workflow), Network Manager, or through the Lynkwell API.
Data Hierarchy
Charging Network (CPO / eMSP)
└── Site Partner (Utility / Site Owner)
    └── Site / Location
        └── Charging Station
Option 1: Projects via Network Manager
Lynkwell's Projects system is a purpose-built onboarding workflow that streamlines the entire process of bringing a new site online. Rather than configuring each component separately, Projects coordinates the work across installers, site hosts, and network administrators in a single guided flow.
With Projects, stations can be onboarded as they are installed in the field by the installer, while site hosts fill out location information on their end. Once everything is in place, the network reviews, approves, and deploys the project directly from Network Manager. This collaborative approach makes the process seamless, reduces delays, and cuts project timelines from several months down to a few days.
Built for:
- Network operators managing large-scale deployments across multiple sites and installers.
- Installers who need a simple way to onboard stations as they are installed in the field.
- Site hosts who want to provide location details on their own schedule without coordinating back and forth with the network.
- Teams looking to reduce project timelines — Projects compresses what typically takes months into days by running tasks in parallel rather than sequentially.
To get started with Projects, contact your Lynkwell Enterprise Solutions Specialist.
Coming soon: A detailed guide for the Projects workflow.
Option 2: Set Up Manually via Network Manager
Network Manager is Lynkwell's enterprise management console for charge point operators (CPOs) and network administrators.
Note: We recommend using the UI to upload locations and stations easily. However, if you prefer uploading them using CSV templates, go to Account > Bulk Uploads to get started.
Step 1: Create a Site Partner
A Site Partner is an associated partner that has a vested interest in the location. This could be a parent company, a utility, or a reporting company.
Every location must be associated with at least one Site Partner. This is a required field when creating a location.
Site Partner Types:
| Type | Description |
|---|---|
| Site Host | A business or property owner that hosts charging stations at their location (e.g., a hotel, parking garage, or retail property). Site Host users have access to the Site Manager portal to monitor and manage their locations. |
| Utility | An electric utility company associated with the charging infrastructure. When a utility is added as a Site Partner, Lynkwell automatically sends them the required reports on a monthly basis. Utility partners do not have access to the Site Manager portal. |
| Reporting Agency | A utility or other entity that needs read-only access to reporting data through the Site Manager portal. |
To create a Site Partner:
In Network Manager, click Site Partners in the left sidebar menu.
Click the Add Site Partner button.
Complete the form with the following fields:
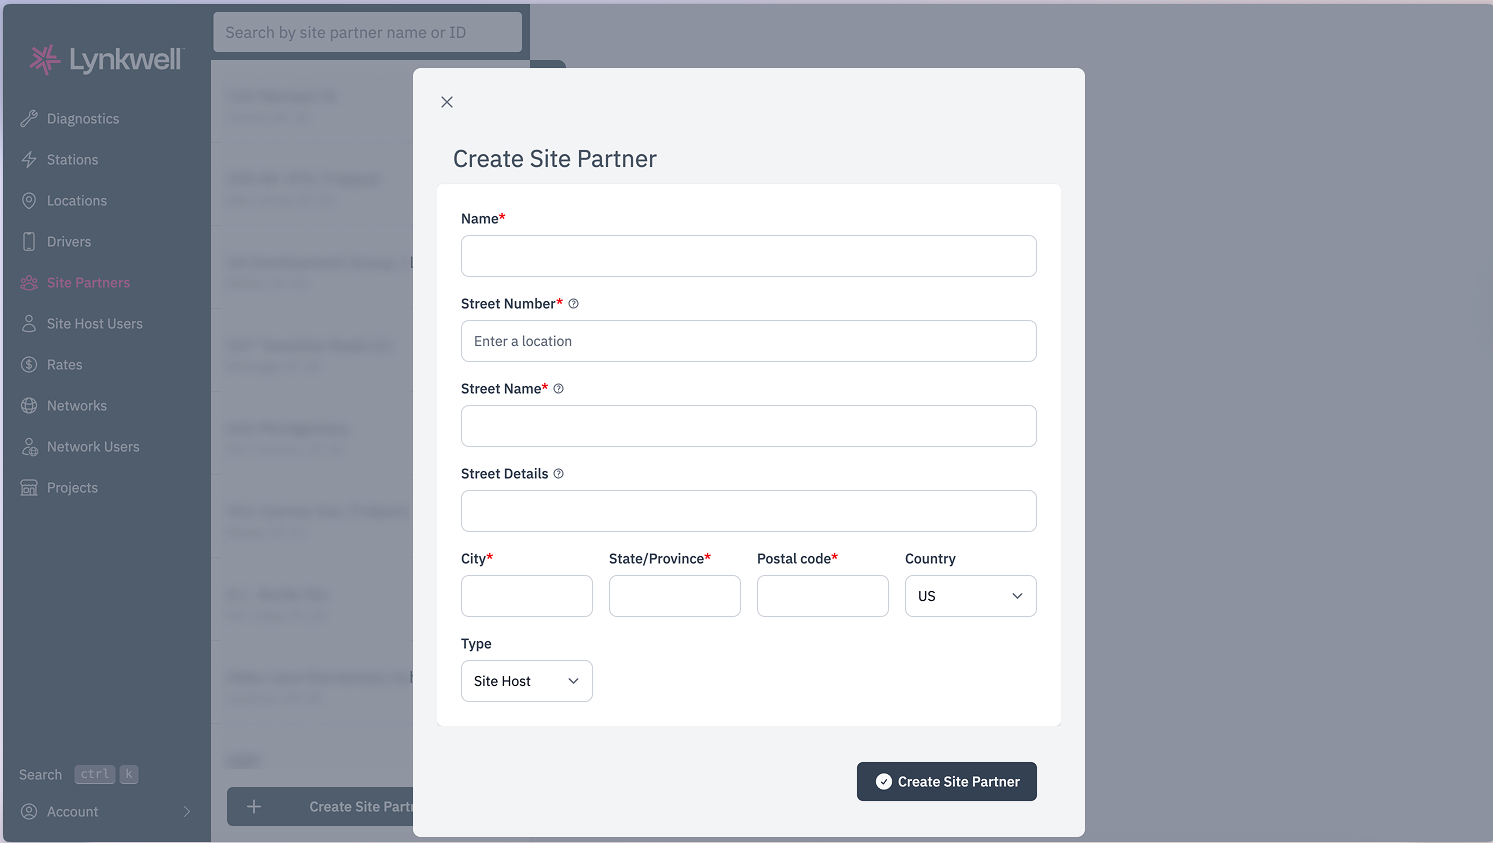
Field Required Description Name Yes The display name for this business entity. Street Number Yes The street number of the Site Partner's address. Begin typing to search for a location — a Google-powered dropdown will appear with address suggestions. Selecting an address will auto-populate the remaining address fields. Street Name Yes The street name of the Site Partner's address. Auto-populated when an address is selected from the dropdown. Street Details No Additional address details such as suite or unit number. City Yes City of the Site Partner's address. Auto-populated when an address is selected from the dropdown. State/Province Yes State or province of the Site Partner's address. Auto-populated when an address is selected from the dropdown. Postal Code Yes Postal or ZIP code of the Site Partner's address. Auto-populated when an address is selected from the dropdown. Country No Country of the Site Partner's address. Defaults to US. Auto-populated when an address is selected from the dropdown. Type No Select Site Host or Utility. Defaults to Site Host. Click Create Site Partner to save.
Step 2: Create a Location
A Location (also referred to as an asset group) represents the physical charging site. Locations contain one or more stations (individual charging assets). Each location is associated with one or more site partners, which determines which site host users can view and manage the location and its stations through Site Manager.
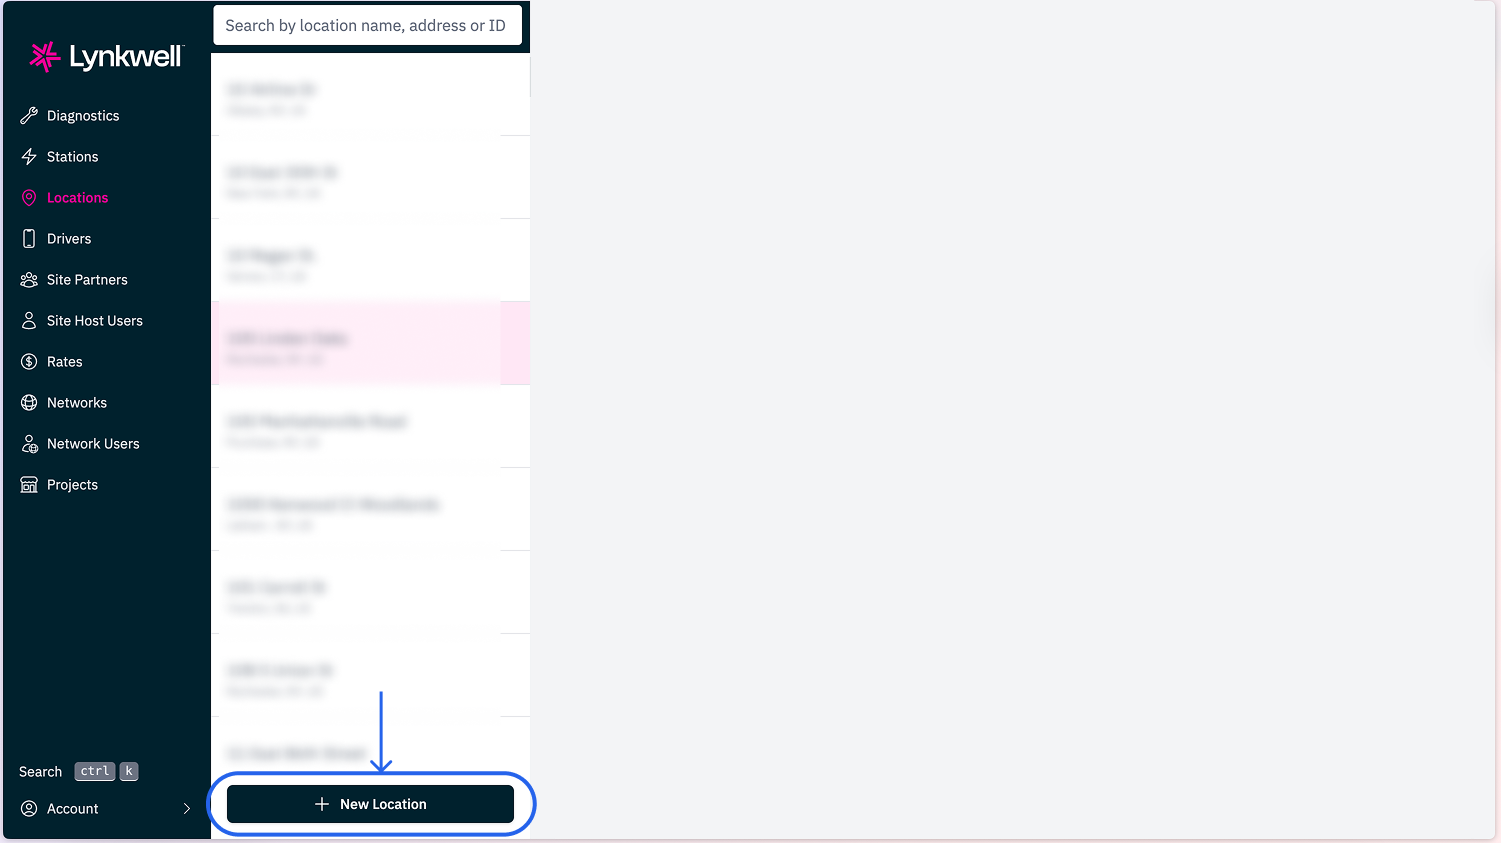
To create a Location:
In Network Manager, click Locations in the left sidebar menu.
Click New Location.
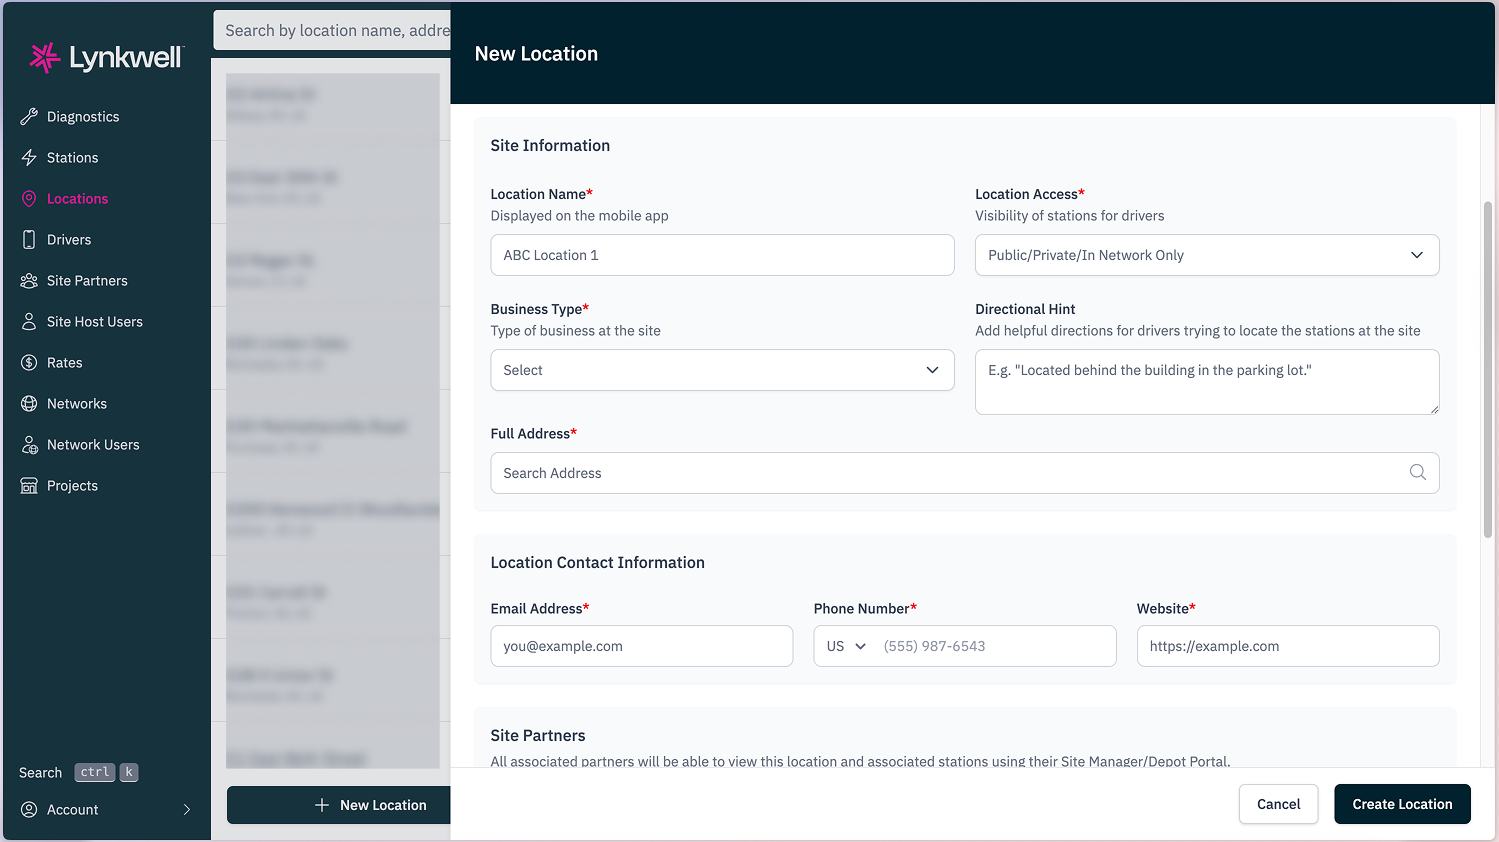
Complete the form with the following fields:
Site Information
Field Required Description Location Name Yes The display name for the site. This is shown to drivers in the mobile app. Location Access Yes Controls the visibility of stations for drivers. Options include Public, Private, and In-Network Only. Public locations make stations visible on the network's mobile app and roaming networks. Private locations restrict access to authorized drivers — drivers can be added later. In-Network Only limits visibility to drivers within the associated network. Business Type Yes The type of business at the site (e.g., hotel, parking garage, retail). Select from the dropdown. Directional Hint No Helpful directions for drivers trying to locate the charging stations at the site (e.g., "Located behind the building in the parking lot."). Full Address Yes The physical address of the site. Use the search field to look up and select the address. Location Contact Information
Field Required Description Email Address Yes A contact email for the location. Phone Number Yes A contact phone number for the location. Select the country code and enter the number. Website Yes The website URL associated with the location. Add Site Partners
This section links the location to one or more Site Partners. All site host users associated with the selected Site Partners will be able to view this location and its associated stations in the Site Manager or Depot Portal. Use the search field to find Site Partners by name, type or ID.
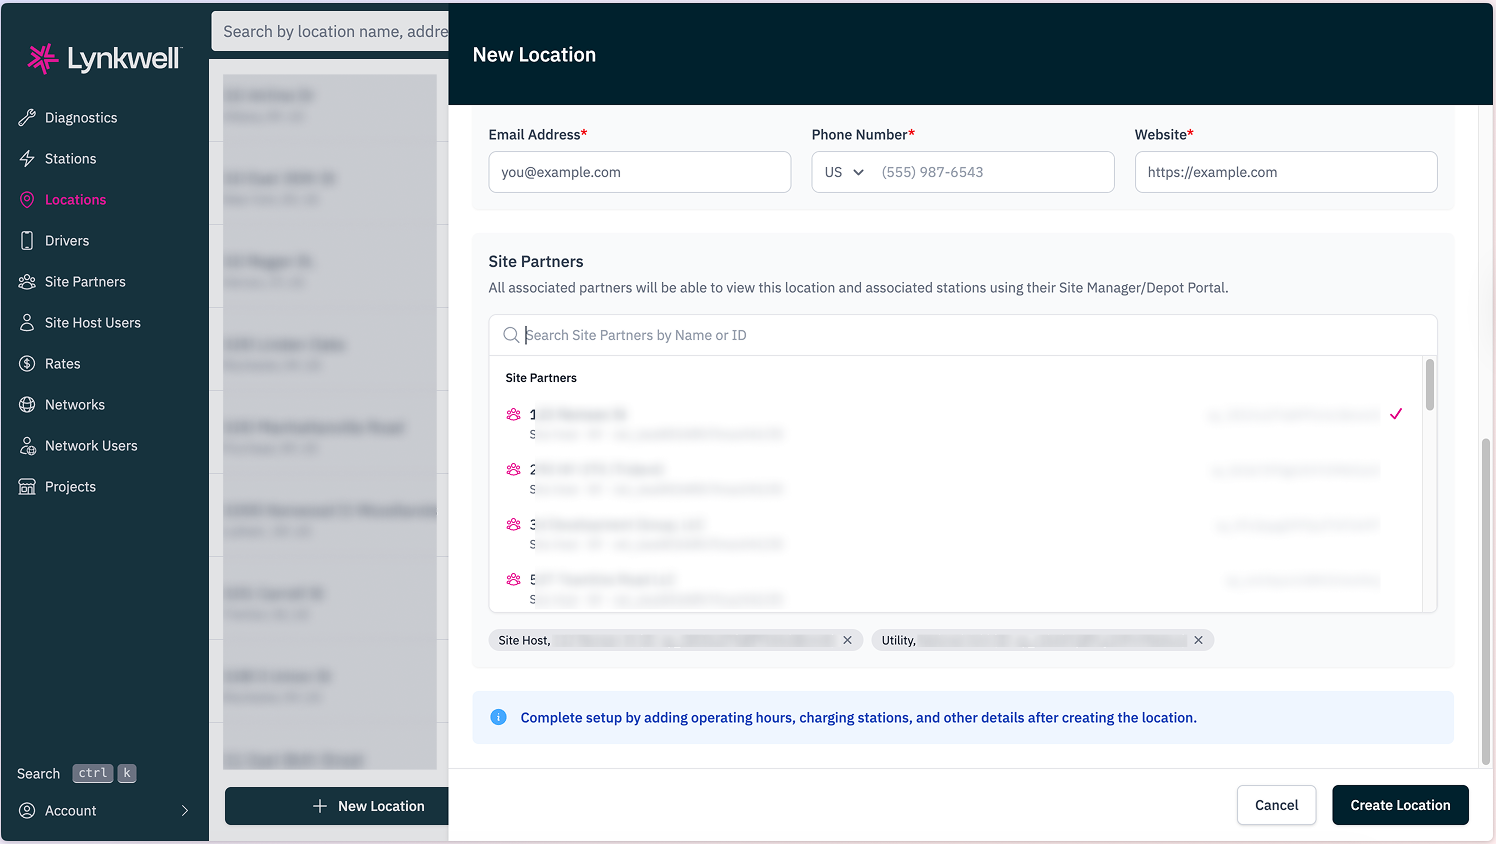
Click Create Location to create the location.
Additional Configuration After Creation
After the location is created, you can complete your setup by configuring the following details from the location's settings page:
- Open Hours — Set the hours during which the site is available for charging. All stations will appear unavailable on the mobile app, outside of charging hours.
- Charging Stations — Add stations (assets) at the location.
- Energy Management — Configure panels and stations to distribute available power across stations when charging.
- Session Limits — Set maximum session durations or energy limits.
- Plug & Charge — Enable ISO 15118 support, allowing drivers to authenticate and start charging simply by plugging in. Contact support to get started.
Step 3: Add Stations
After creating the location, you can add charging stations (assets) to it. Each station represents a physical charger at the site.
To add stations:
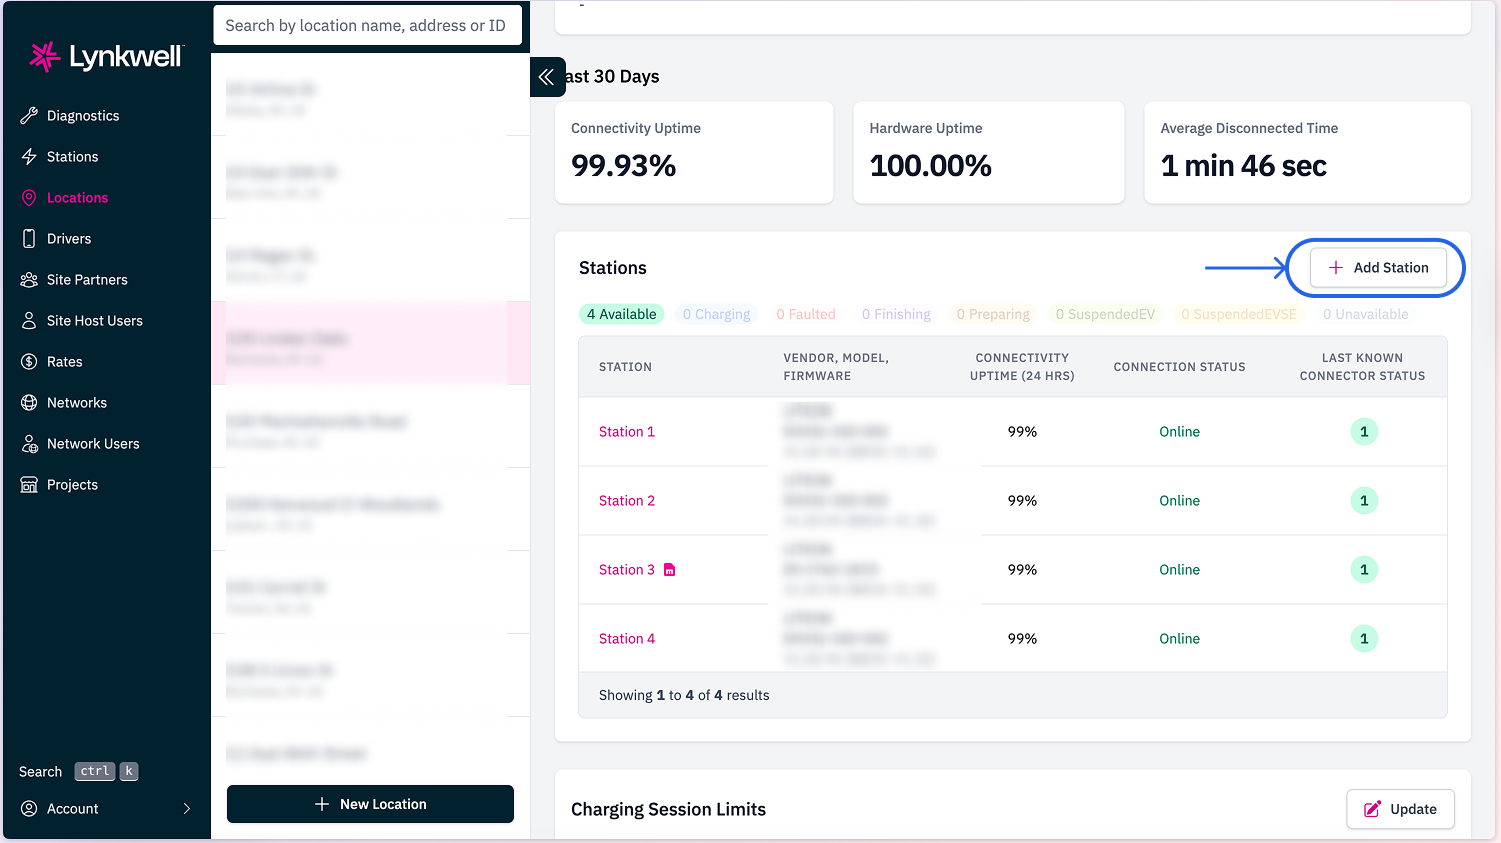
Navigate to the location's page in Network Manager.
Scroll down to the Stations table.
Click the Add Station button. A form opens where you can add one or more stations at a time.
For each station, complete the following fields:
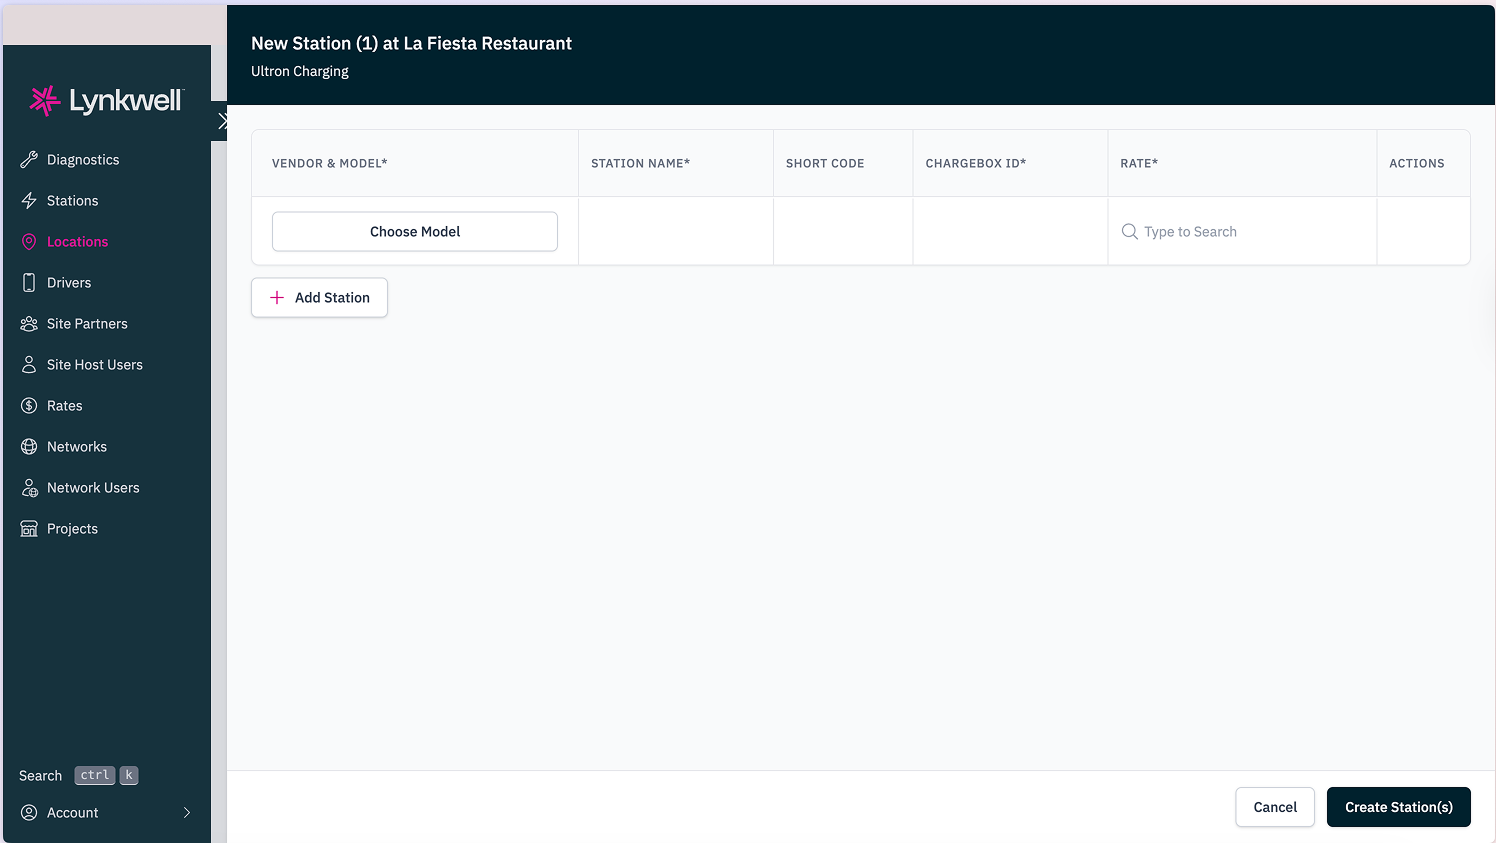
Field Required Description Vendor & Model No Click Choose Model to select the station's hardware. Prefill station information by selecting from a list of hardware models supported by the network, or add manually if your model is not listed. Station Name Yes A display name for the station. Short Code No A 4-character alphanumeric identifier for the station. Networks typically place short code stickers on the station hardware to help drivers easily find a station at the site. This code is also displayed in the mobile app. Chargebox ID Yes The logical identifier of the charging station within the OCPP system. This ID is often configured to be the same as the station's serial number at the time of commissioning and must be unique within the CSMS. It is used as part of the WebSocket connection URL (e.g., /ocpp/CS00123) and allows the CSMS to uniquely identify the charger on the backend. The Chargebox ID can be changed if the station is re-provisioned or moved to a different network.Rate Yes The pricing rate to apply to this station. Use the search field to find and select from available rates configured on the network. Adding a station model manually
If the station's vendor and model is not available in the supported list, enter the hardware details directly:
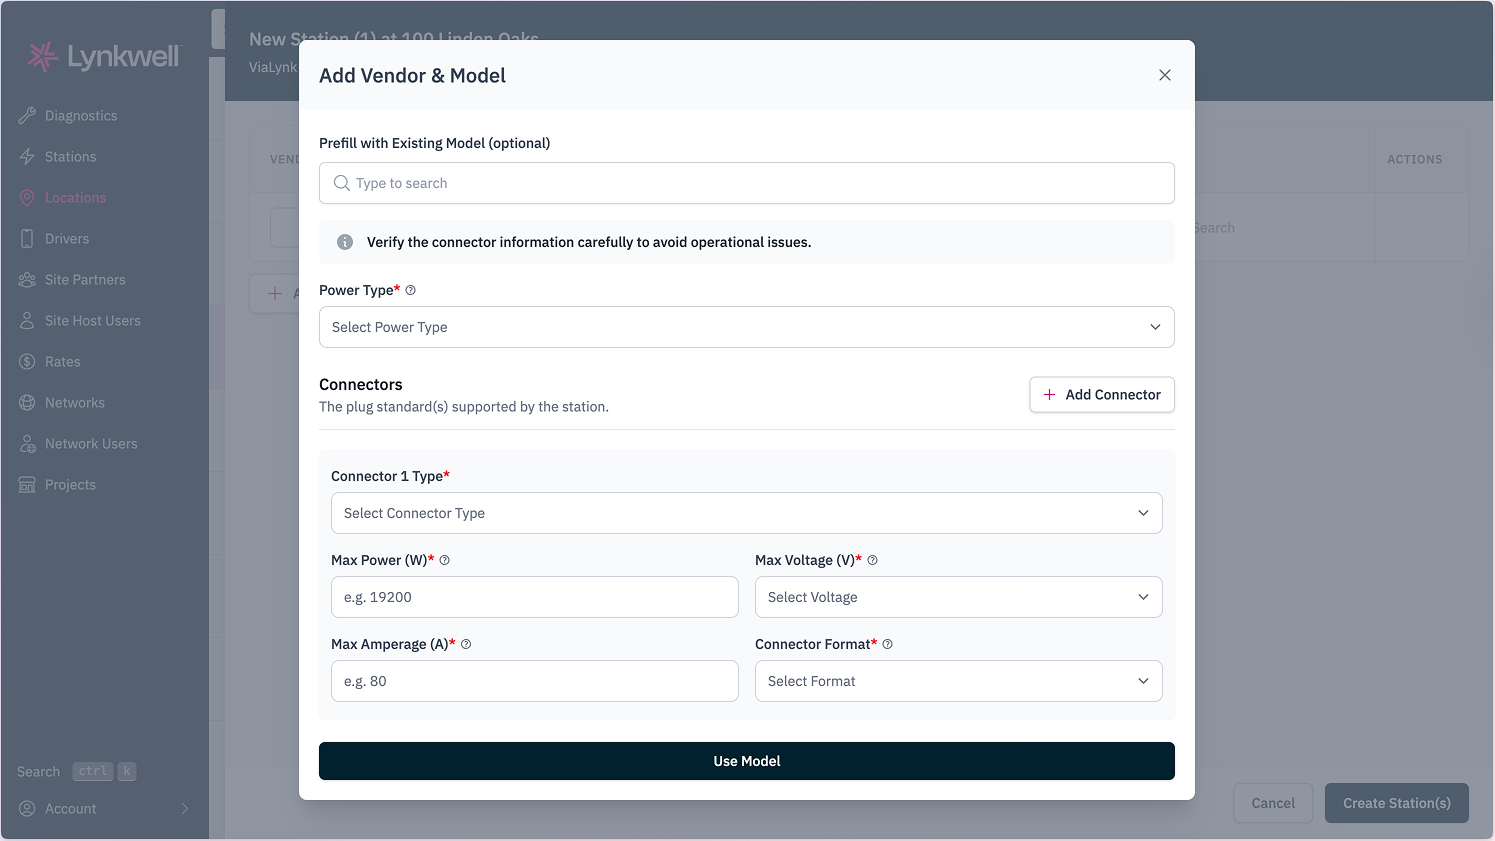
Field Required Description Power Type Yes The type of power delivered by the station (AC or DC). Connector Type Yes The plug standard supported by the station (e.g., J1772, CCS). Click Add Connector to add additional connectors. Max Power (kW) Yes Maximum power that can be delivered by a connector, in kiloWatts (kW). Max Voltage (V) Yes The maximum voltage that can be safely applied to a connector, measured in Volts (V). Max Amperage (A) Yes The maximum current that can flow through a connector, measured in Amperes (A). Connector Format Yes The classification of the connector — typically cable or socket. Verify the connector information carefully to avoid operational issues.
To add more stations, click + Add Station to add another row.
Note: When you add a new station row, the Vendor & Model and Rate from the previous row are automatically copied over — so you don't need to re-enter that information for each station.
When all stations are configured, click Create Station(s) to create the stations.
Important: This is a synchronous process. Please keep the browser tab open while the stations are being added to avoid losing progress.
If some stations fail to upload, you may address the errors and hit Retry Upload to upload the remaining stations to the location.
Step 4: Add Site Host Users
Site Host users can monitor and manage charging operations at their location(s) through Site Manager — Lynkwell's site-level management portal.
To create a Site Host user:
In Network Manager, click Site Host Users in the left sidebar menu.
Click the Create User button.
Complete the form with the following fields:
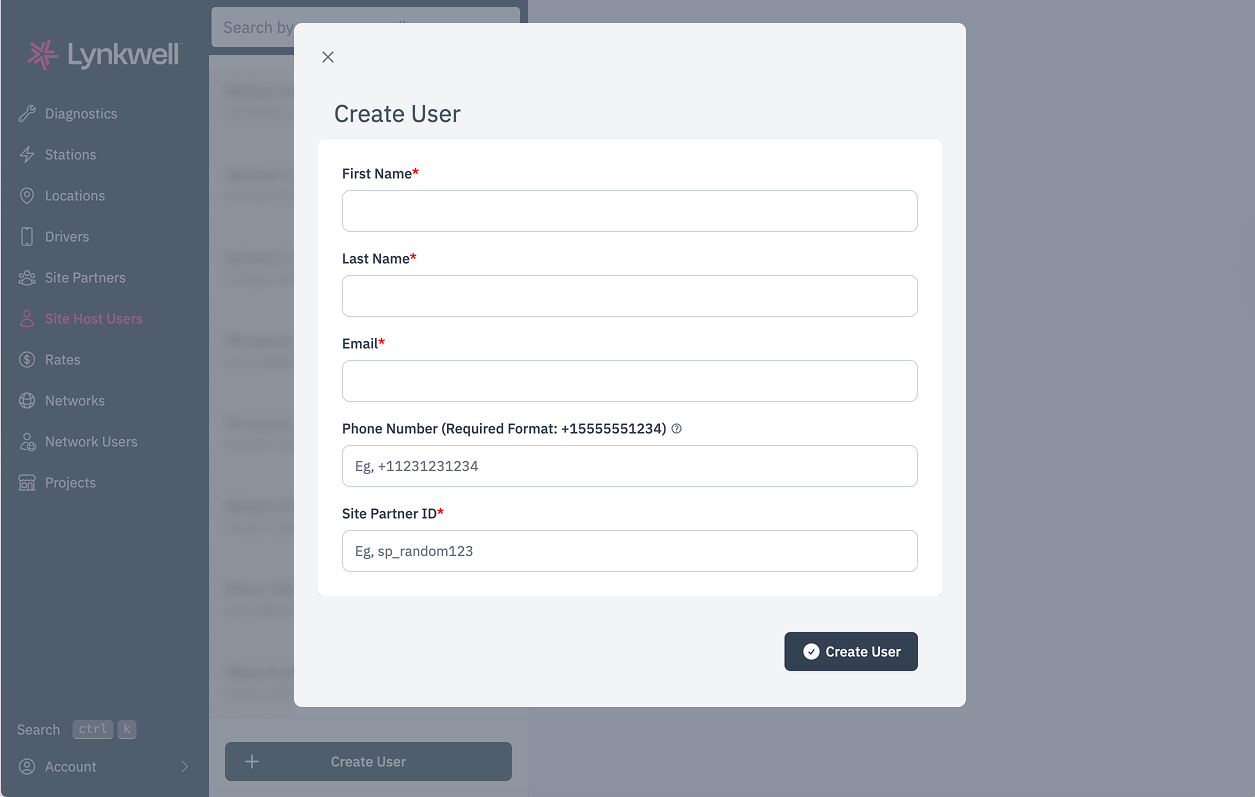
Field Required Description First Name Yes The first name of the user. Last Name Yes The last name of the user. Email Yes The email address for the user's account. This will be used for login and notifications. Phone Number No The user's phone number. Must be in the format +15555551234.Site Partner ID Yes The ID of the Site Partner to associate with this user (e.g., sp_random123). Find this ID on the respective Site Partner page. The user will have access to all locations linked to this Site Partner.Click Create User to save.
Once created, the user will receive an email invitation to set up their account and access their locations through the Site Manager (link included).
Additional Features
- Driver Discounts — Site hosts can offer discounted pricing to specific drivers. Driver Discounts are created within the Site Manager. Driver access can be managed through either Site Manager or Network Manager.
- Private Location Access — For locations set to Private, site hosts can add authorized drivers under the Site Partner. Only these drivers will be able to access the private locations on the network's mobile app. Driver access can be managed through either Site Manager or Network Manager.
Option 3: Via Lynkwell API
For CPOs and partners who need to automate site provisioning or integrate Lynkwell into existing systems, the Lynkwell API provides programmatic access to create and configure sites. The API is organized around REST with predictable resource-oriented URLs under the Asset Management API.
Note: The Create Site Partner, Create Site Partner User, and related write endpoints are not enabled by default. You must request additional permissions from Lynkwell before using them.
For full endpoint specifications, query parameters, and response schemas, see the Lynkwell API Reference. The examples below demonstrate practical usage for setting up a new site.
Prerequisites
Before making API calls, you need to authenticate using OAuth 2.0 client credentials. See the Quick Start guide for instructions on creating an API client in Network Manager and obtaining an access token.
All examples below assume you have a valid ACCESS_TOKEN.
Step 1: Create a Site Partner
Use the Create a site partner endpoint to create the business entity that will own the location. The type field determines which detail object you populate — include the matching object (siteHost, utility, or reportingAgency) for the type you select.
Example — Creating a Site Partner:
curl --request POST \
  --url "https://api.lynkwell.com/asset-management/v1/site-partners" \
  --header "Content-Type: application/json" \
  --header "Authorization: Bearer ACCESS_TOKEN" \
  --data '{
    "type": "siteHost",
    "network": "nw_abc123",
    "siteHost": {
      "name": "Greenfield Hotel Group",
      "physicalAddress": {
        "streetNumber": "450",
        "streetName": "Union St",
        "streetDetails": "Suite 200",
        "city": "Schenectady",
        "state": "NY",
        "postalCode": "12305",
        "countryCode": "US"
      },
      "contactDetails": {
        "phone": "+15185551234",
        "email": "operations@greenfieldhotels.com"
      }
    }
  }'
A successful 200 response returns the created site partner object, including its id (e.g., "sp_q354636xd4r0EZkG0"). Save this ID — you'll need it when creating the location.
Step 2: Create a Location (Asset Group)
Use the Create a new asset group endpoint to create the location. In Lynkwell's API, a location is an asset group with type set to "location". The sitePartners array links it to one or more Site Partners created in Step 1.
Example — Creating a public hotel location:
curl --request POST \
  --url "https://api.lynkwell.com/asset-management/v1/asset-groups" \
  --header "Content-Type: application/json" \
  --header "Authorization: Bearer ACCESS_TOKEN" \
  --data '{
    "type": "location",
    "network": "nw_abc123",
    "sitePartners": ["sp_q354636xd4r0EZkG0"],
    "location": {
      "name": "Greenfield Hotel - Downtown",
      "visibility": "PUBLIC",
      "businessType": "HOTEL",
      "physicalAddress": {
        "streetNumber": "450",
        "streetName": "Union St",
        "city": "Schenectady",
        "state": "NY",
        "postalCode": "12305",
        "countryCode": "US"
      },
      "contactDetails": {
        "phone": "+15185551234",
        "email": "evcharging@greenfieldhotels.com",
        "website": "https://www.greenfieldhotels.com"
      },
      "geoLocation": {
        "latitude": 42.8142,
        "longitude": -73.9396
      },
      "directionHint": "Chargers are located in the rear parking garage on level 1.",
      "hours": {
        "twentyfourseven": true
      },
      "allowChargingWhenClosed": true,
      "parkingType": "PARKING_GARAGE",
      "industryVertical": "RETAIL_AND_HOSPITALITY"
    }
  }'
A successful 200 response returns the created asset group, including its id. You can use this ID with other API endpoints to add stations (assets), update location details, or manage site partners associated with the location.
Step 3: Create a Station (Asset)
Use the Create a new asset endpoint to add a charging station to the location. The assetGroup field links the station to the location (asset group) created in Step 2.
Example — Creating a station:
curl --request POST \
  --url "https://api.lynkwell.com/asset-management/v1/assets" \
  --header "Content-Type: application/json" \
  --header "Authorization: Bearer ACCESS_TOKEN" \
  --data '{
    "network": "nw_abc123",
    "assetGroup": "ag_xyz789",
    "type": "chargingStation",
    "chargingStation": {
      "name": "Station 01",
	    "serialNumber": "SN12345678",
	    "powerType": "AC_1_PHASE",
	    "rate": "rate_oweijfwioe",
      "connectors": [
        {
          "type": "J1772",
          "format": "CABLE",
          "maxPower": 19200,
          "maxVoltage": 240,
          "maxAmperage": 80
        }
      ]
    }
  }'
A successful 200 response returns the created asset object, including its id. You can use this ID with other API endpoints to update station details or manage its configuration.
Note: For full request and response schemas, including all supported power types, connector types, and optional fields, see the Assets API reference.
Step 4: Create a Site Partner User
Use the Create a new site partner user endpoint to add a user who can access the location through Site Manager. The partner field links the user to the Site Partner created in Step 1 — they will have access to all locations associated with that partner.
Example — Creating a site host user:
curl --request POST \
  --url "https://api.lynkwell.com/asset-management/v1/site-partner-users" \
  --header "Content-Type: application/json" \
  --header "Authorization: Bearer ACCESS_TOKEN" \
  --data '{
    "email": "jmartin@greenfieldhotels.com",
    "partner": "sp_q354636xd4r0EZkG0",
    "firstName": "Jordan",
    "lastName": "Martin"
  }'
A successful 200 response returns the created user object. The user will receive an invitation to set up their account and access their locations through Site Manager.
Additional Resources
- Full API Reference: docs.lynkwell.com/api — Complete endpoint specs, query parameters, and response schemas.
- Asset Management API: Includes additional endpoints for listing, updating, and archiving site partners, locations, and users.
- Support: Contact Lynkwell's support team for API access and onboarding assistance.